Chapter 0
Before you start
ConferenceQ is one continuous flow: the audience joins by QR and asks in their own language, the question is translated and reviewed, and it reaches the presenter’s screen. This chapter lays out that flow and the people in it.
The four roles
| Role | Who | What they do |
|---|---|---|
| Audience | Anyone who scanned the QR | Asks and upvotes. Never signs in. |
| Moderator | Decides what goes out | Reviews, approves, hides, fixes translations, builds the running order. |
| Event Manager | The team preparing the event | Handles events, sessions, QR codes, materials and the Glossary. |
| Presenter | The speaker on stage | Sees approved questions with original and translation together. |
The path a question takes
- 1SubmittedThe audience writes in their own language
- 2TranslatedTranslated with the Glossary applied
- 3ReviewedA moderator approves or hides it
- 4QueuedIt joins the running order
- 5AnsweredThe presenter answers and marks it done
A role is a permission set, not a person. The same person can moderate one event and manage another.
Chapter 1
Signing up and signing in
You sign up as an institution, not as an individual. Whoever signs up becomes its first admin, and adds colleagues from the console afterwards.
Creating your institution
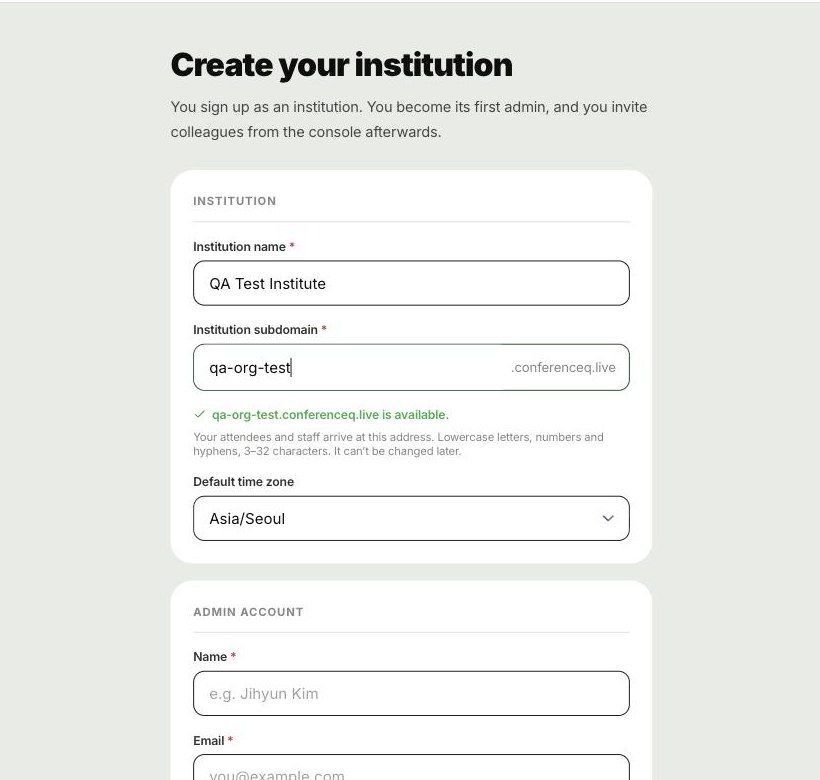
- Institution name — shown as-is on the audience screen and in the console header.
- Institution subdomain — the address your attendees and staff arrive at. Lowercase letters, numbers and hyphens, 3–32 characters. Availability is checked as you type.
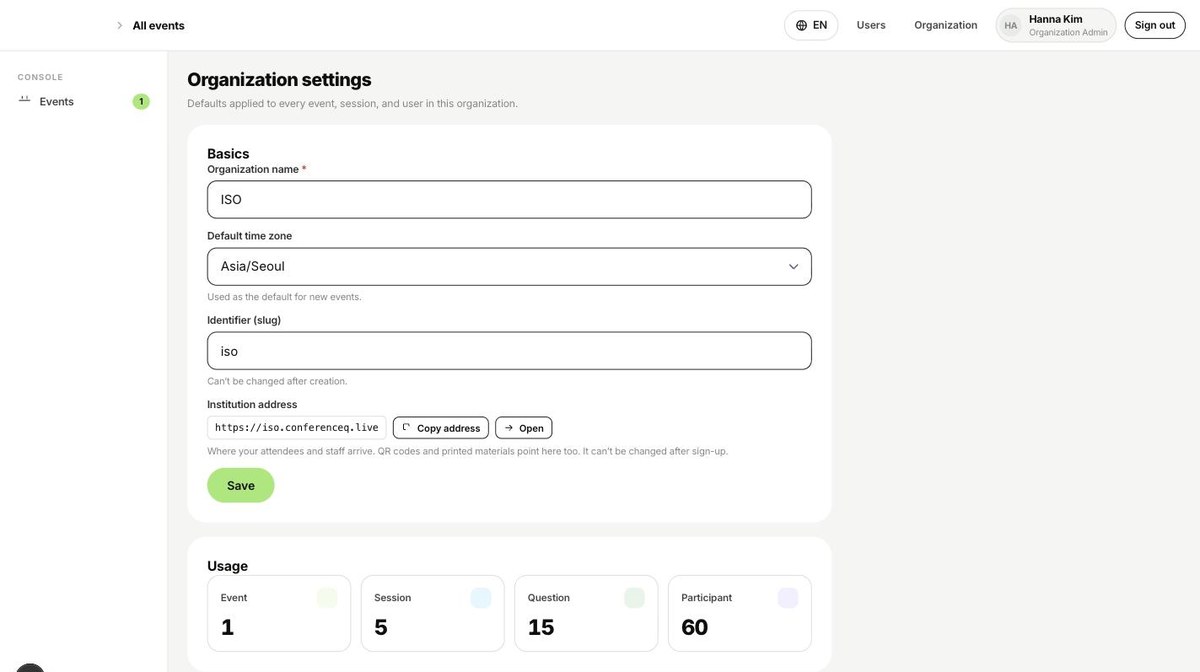
- Default time zone — the default for new events. Each event can override it.
- Admin account — name, email, password. Each requirement ticks off as you satisfy it.
The subdomain can’t be changed later. Every QR code and printed programme you hand out points at it. Pick a short name for the institution, not for one event.
Signing in
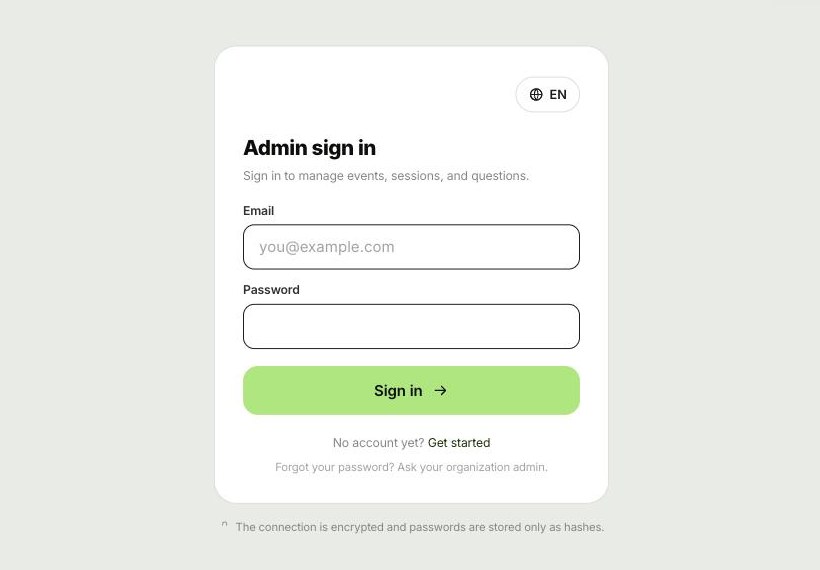
If you forget your password, an organization admin creates a reset link from User management and sends it to you. Open it, choose a new password, and you are signed in. The link expires after 24 hours and works once.
When sign-up completes you land on your institution’s own sign-in page (for example iso.conferenceq.live/admin/login). The certificate is issued automatically on that first visit — there is nothing to register. You can copy the address any time from Organization settings in the console.
Chapter 2
Preparing an event
Create the event, add its sessions, then prepare the QR codes, materials and terminology. This is everything you do before the day itself.
Create the event
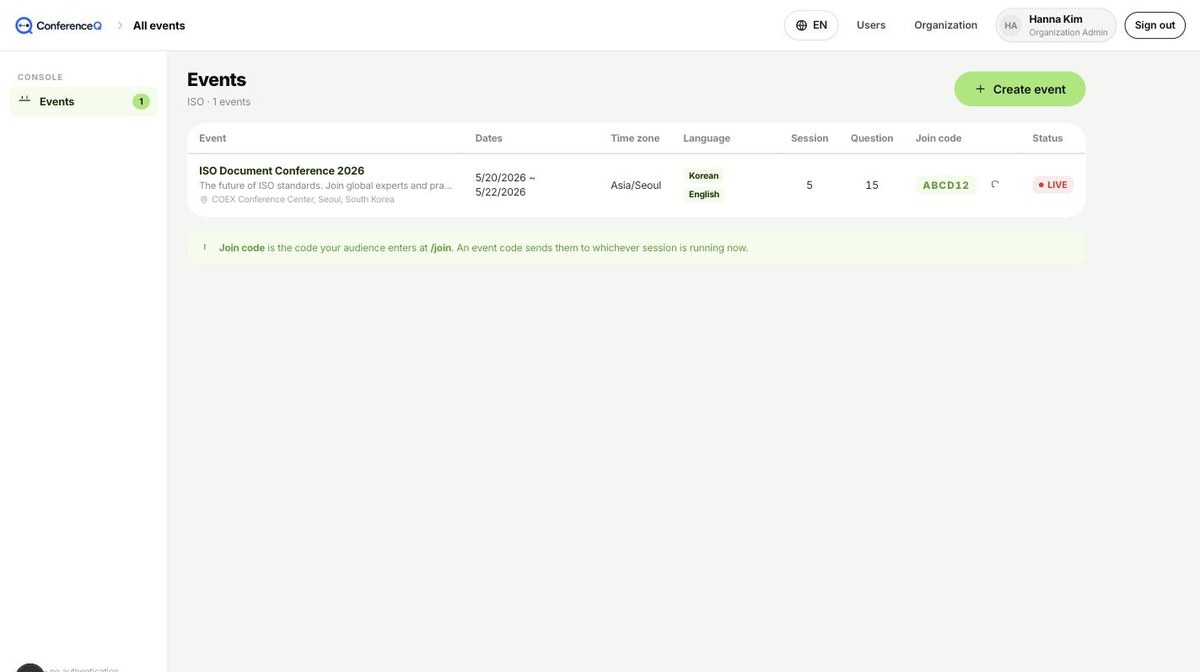
The join code is what your audience types at /join. An event code sends them to whichever session is running at that moment, so one printed code covers an event with many sessions.
Sessions and their status
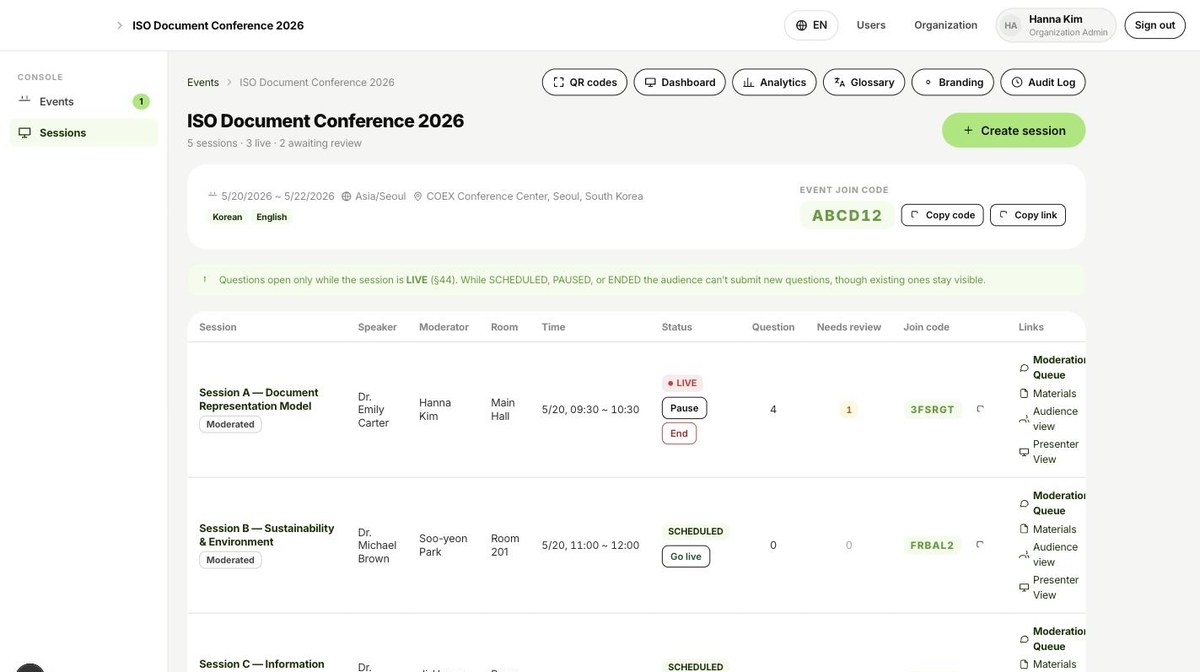
| Session status | Meaning |
|---|---|
| Scheduled | Not taking questions yet. |
| Live | Questions are open. |
| Paused | Submission closes; the screen stays. |
| Ended | Questions and answers remain readable. |
| Archived | The Q&A page goes down and the materials are deleted. |
Questions open only while the session is live. While it is scheduled, paused or ended the audience can’t submit new questions, though existing ones stay visible.
Generating and handing out QR codes
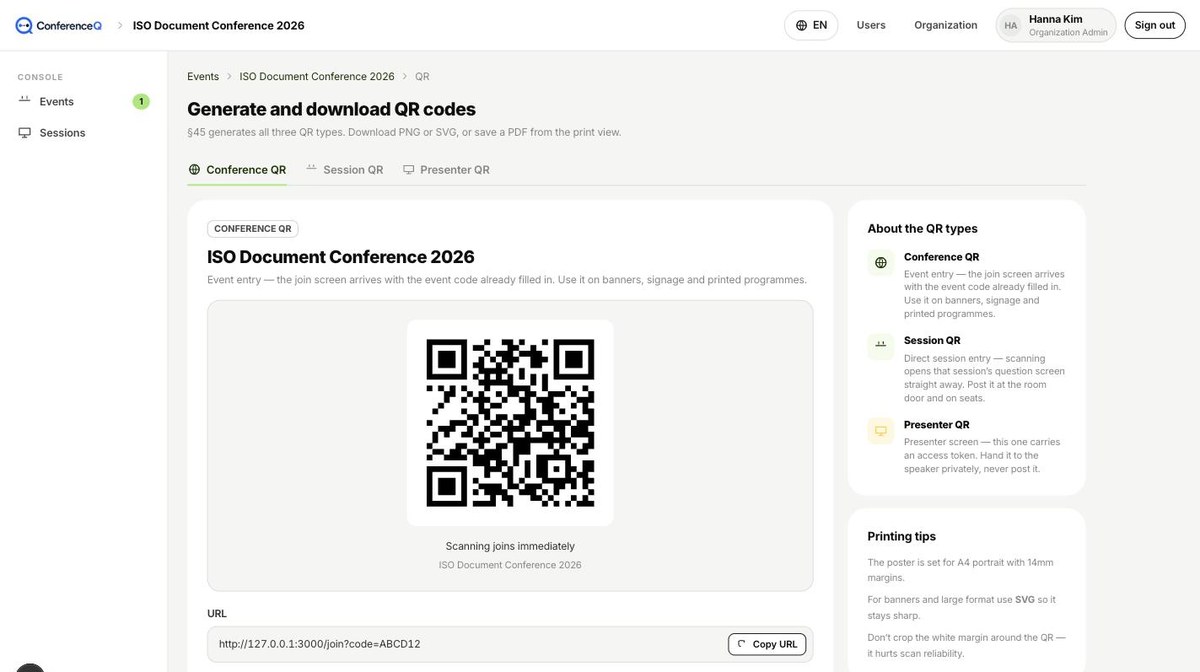
| Type | Where it goes | Meaning |
|---|---|---|
| Conference QR | Event entry | The join screen arrives with the event code filled in. Use it on banners, signage and printed programmes. |
| Session QR | Direct session entry | Scanning opens that session’s question screen straight away. Post it at the room door and on seats. |
| Presenter QR | Presenter screen | This one carries an access token. Hand it to the speaker privately. |
| Registration QR | Pre-registration | Opens the form that collects attendees before the event. Share it on invitations, posters and messengers. |
The Presenter QR carries an access token. Anyone with that link can open the presenter screen — hand it to the speaker privately and never put it on a banner, a seat or a printed programme.
Uploading presentation materials
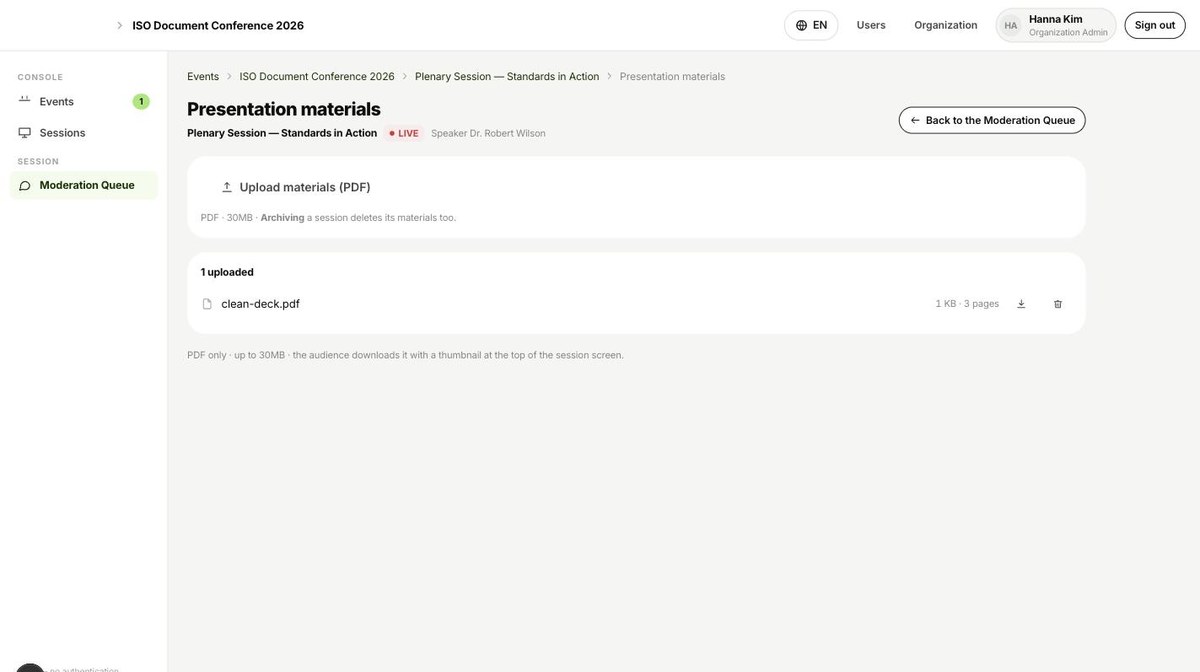
Files are deleted when you archive the session. Ending it does not delete them — people still read the questions and answers of a finished session, and they need the deck alongside.
Glossary — pinning your terminology
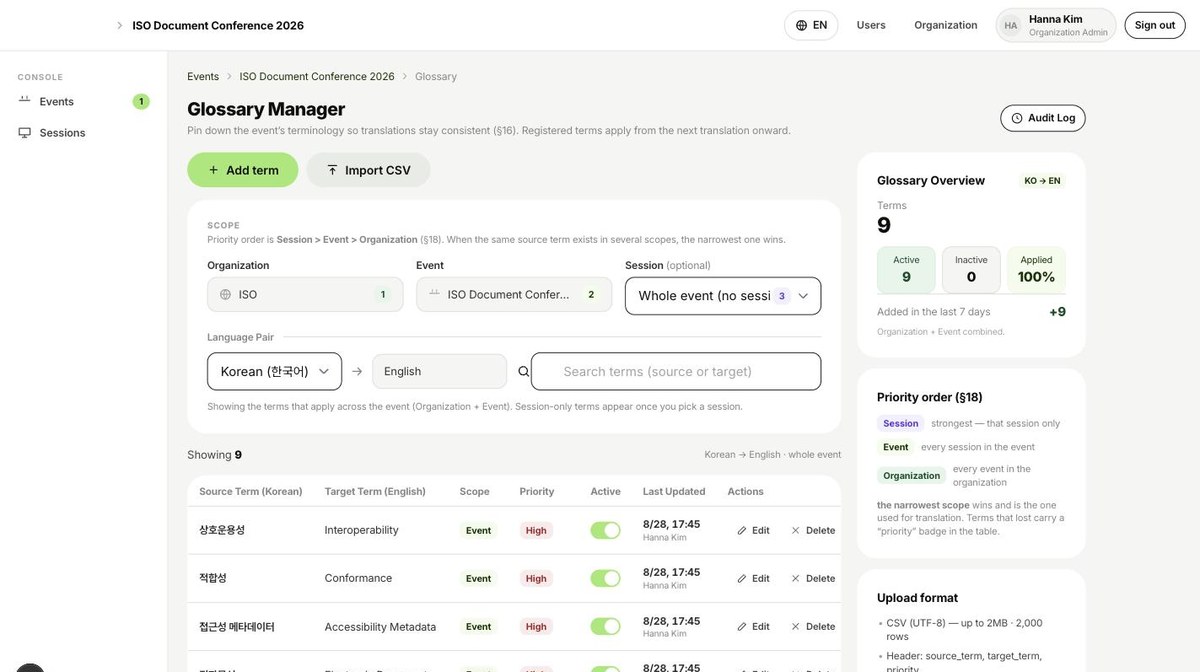
Priority runs Session > Event > Organization. When the same source term exists in several scopes, the narrowest one wins. A new term applies from the next translation onward — questions already translated are left as they are.
Branding
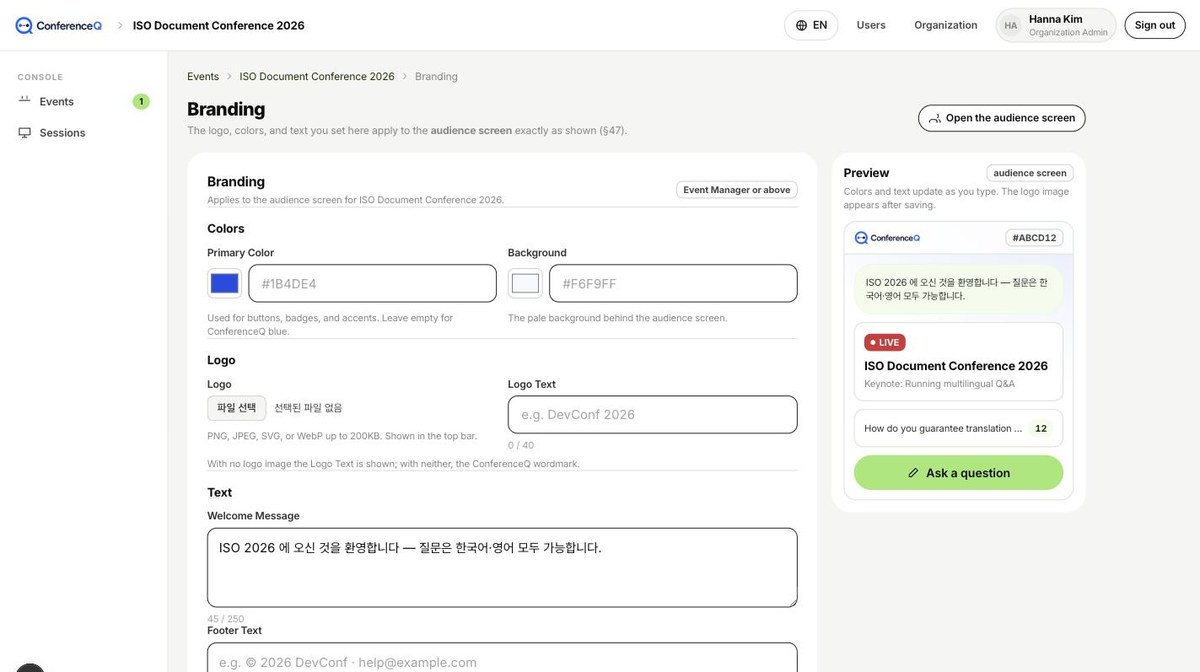
Chapter 3
Collecting attendees in advance
Use this when you want to collect attendees before the day. You get one address (/r/code) and a QR; the attendee leaves their details, confirms their email, and receives a personal entry link by mail. You can also restrict a session so only those people can join the Q&A.
① Create a form
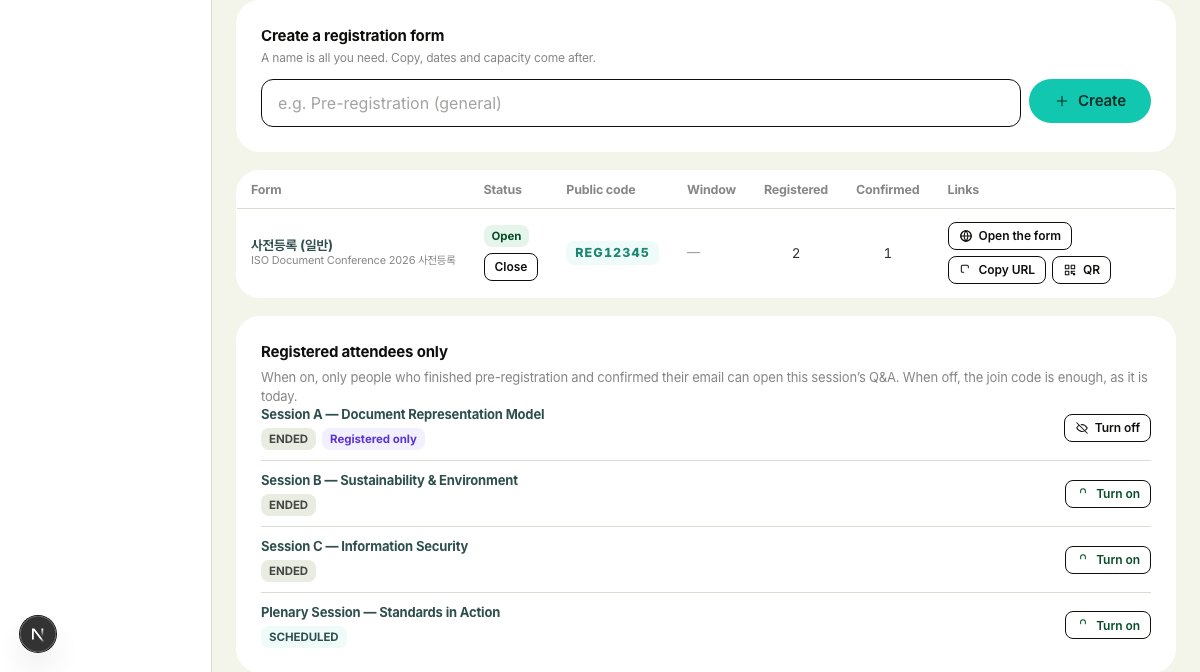
- The form name is internal. You can create several forms per event — advance and on-site, general and VIP.
- You get a public code such as
REG12345, and the address becomes…/r/REG12345. - It starts open. Set it to unpublished if you are not ready to announce it yet.
- Leave the window and capacity empty for no limit. Unconfirmed registrations take a seat too.
② Dress the page — image and background
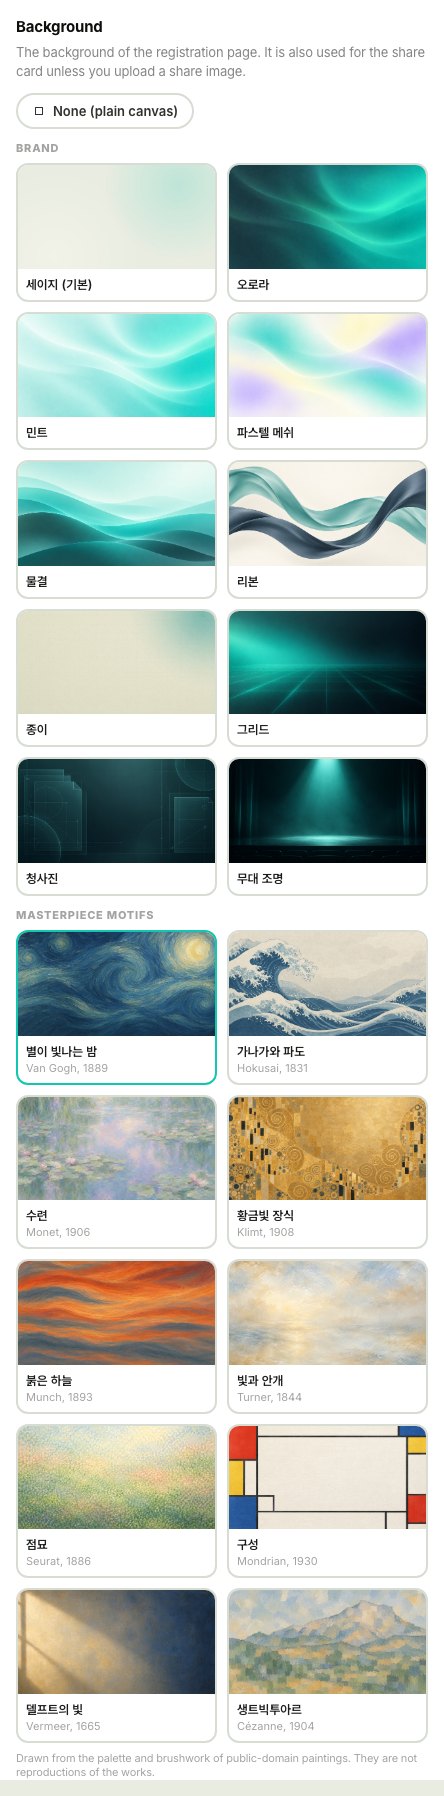
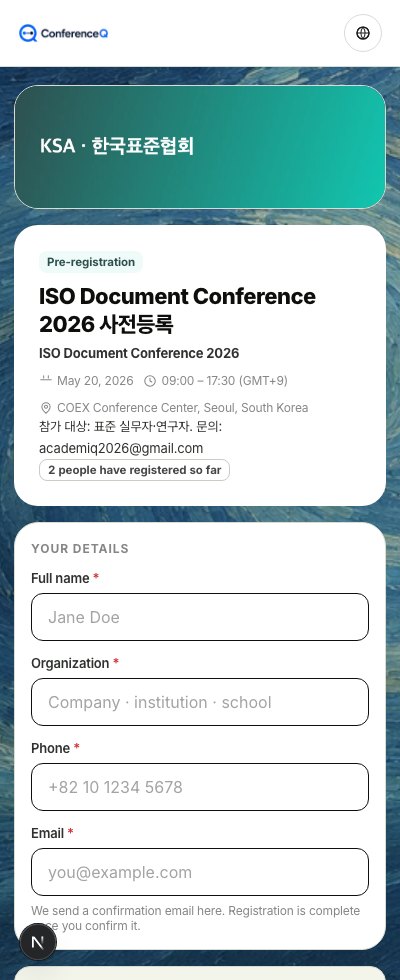
The content cards stay white, so any background remains readable. On a dark background the text and logo outside the cards switch to their light version.
③ Set the messenger preview
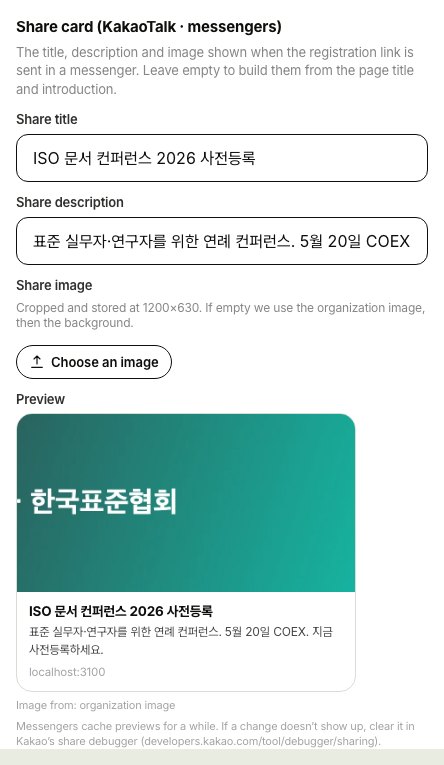
- Leave them empty and they are built from the page title and introduction. The card appears either way.
- The image is chosen in the order share image → organization image → background. Fill the first one only if you want a different picture just for sharing.
- The share image is cropped to 1200×630, the ratio messengers ask for.
Messengers cache the preview for a while. If a change doesn’t show up, paste the address into Kakao’s share debugger (developers.kakao.com/tool/debugger/sharing) and clear it.
④ Share it as a QR code
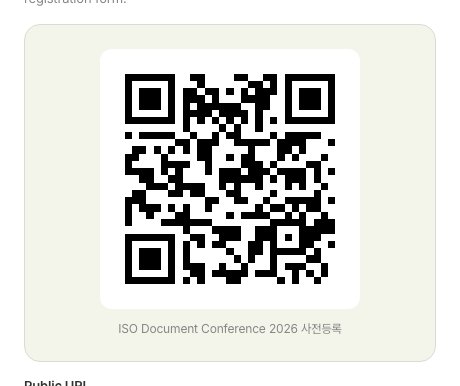
The same QR is also available on the event’s QR screen, under the Registration tab. A registration address carries no join code, so it is safe to put on posters, invitations and your website.
⑤ What the attendee goes through
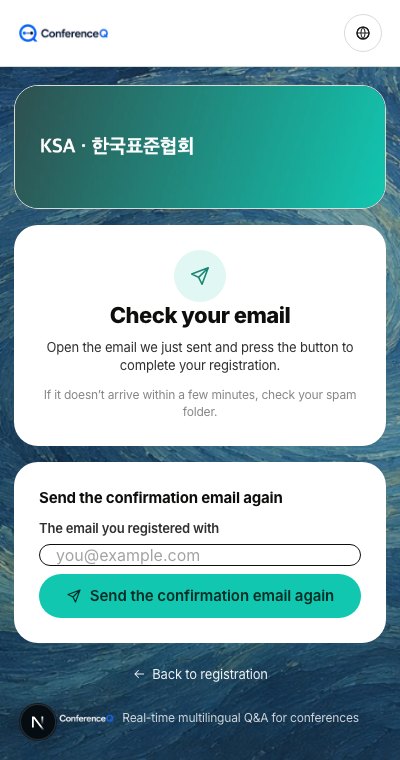
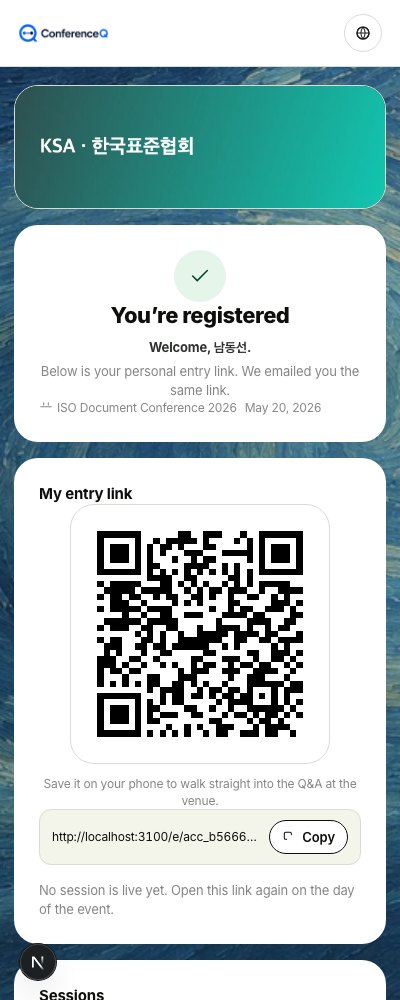
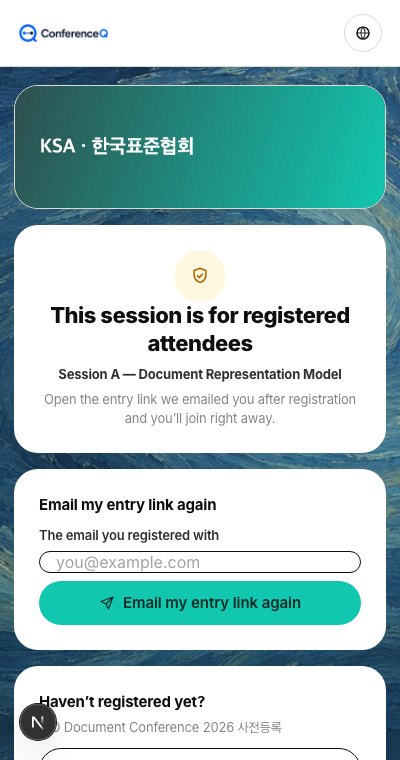
- Restricting entry is a per-session switch, turned on and off in the session list further down the registration screen.
- When on, only people who confirmed their email can open that session’s Q&A. When off, the join code is enough, as usual.
- The entry link is issued to one person. Opening it once leaves the credential on that device for the day of the event.
⑥ Checking and exporting registrants
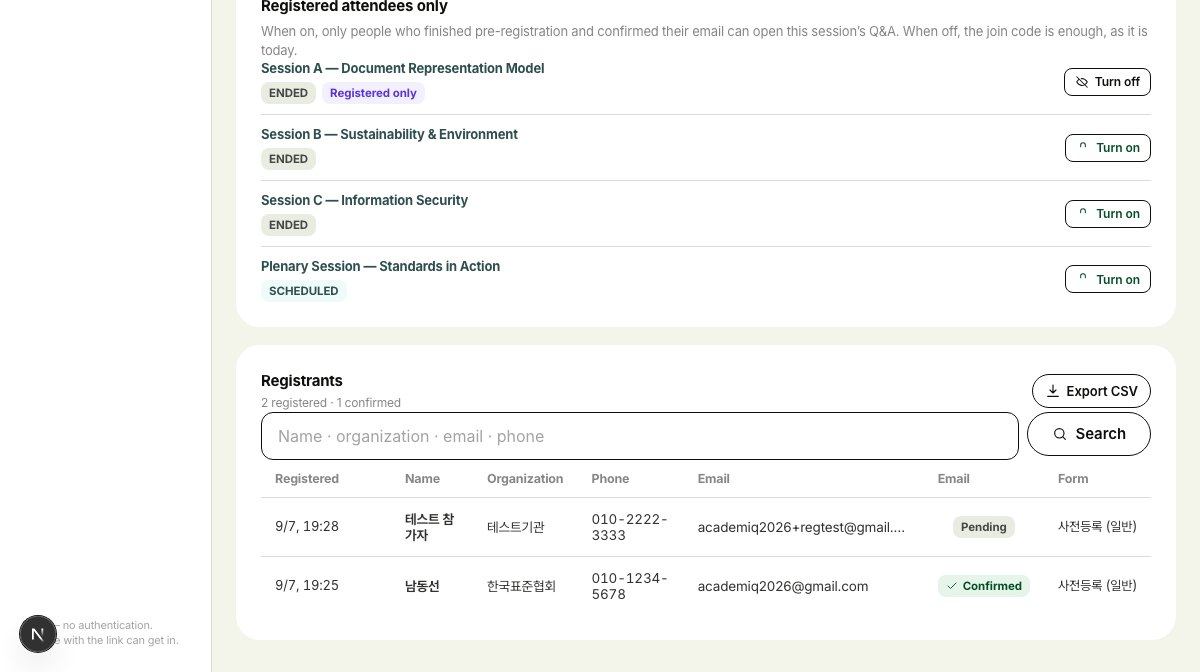
This list holds personal contact details. Every CSV export is written to the audit log, and the file never contains entry links — one file must not become everyone’s way in. Registrations left unconfirmed for 30 days are deleted automatically.
Confirmation emails need mail delivery configured (BREVO_API_KEY). Without it a banner appears on the registration screen and the mail is only written to the server log.
Chapter 4
What the audience sees
The audience installs nothing and signs in to nothing. Scanning a QR or typing a code is the whole of it — but one of the two is required. The code is the key to the room.
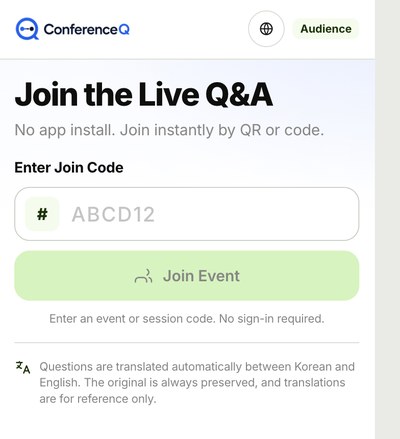
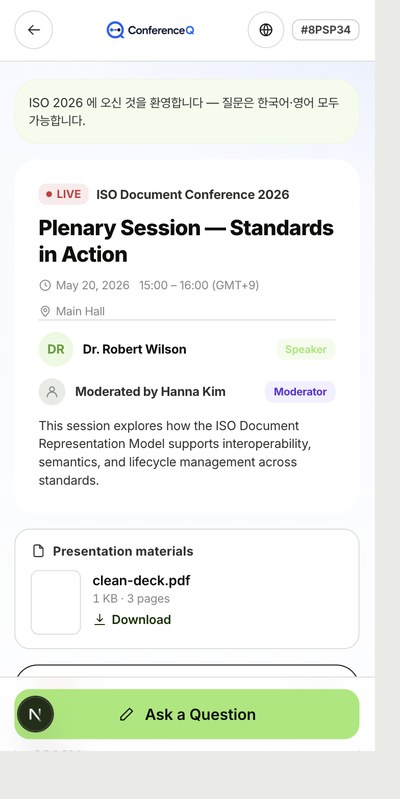
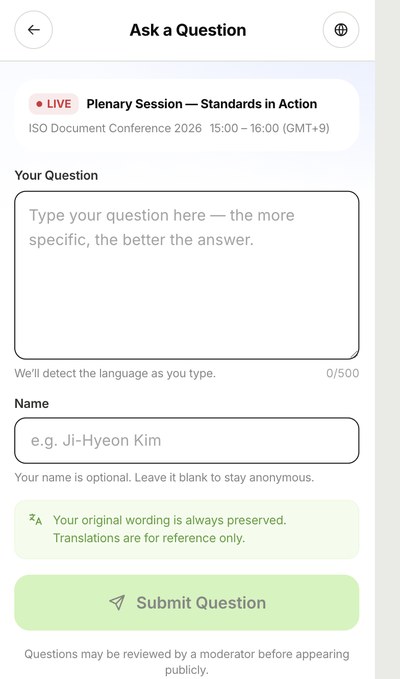
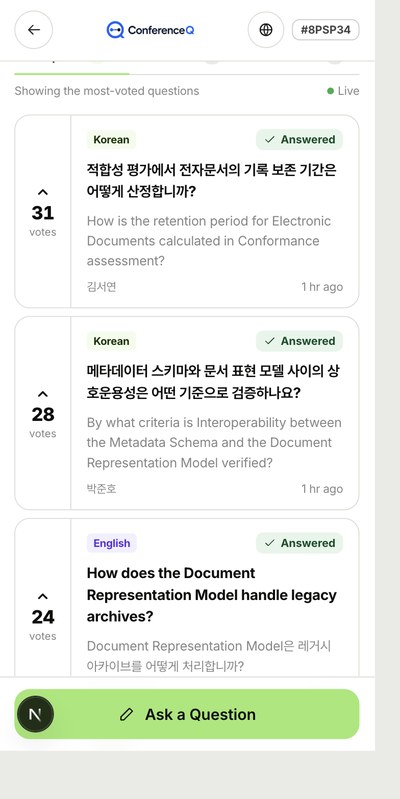
Taking part in a poll
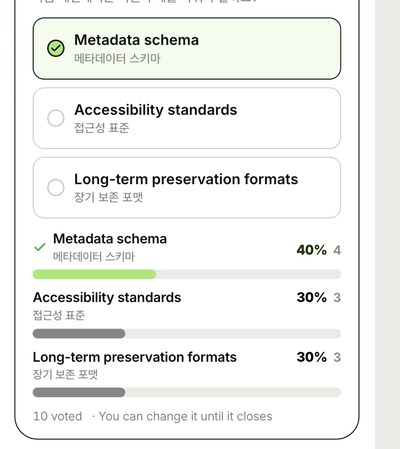
The clock at the top right is the time left. It turns red at ten seconds and the server closes the poll at zero. The server decides, not the clock on your screen — a tap at the very last moment may not be counted.
The join code is the door. Only people you handed a QR or a printed code get in. Code entry is capped at 10 attempts a minute so codes can’t be guessed. When the event is over, end the session to close new questions.
The original is never overwritten by its translation. Even when a moderator edits the translation, the original and the machine version both remain. Names are not translated either — they are what the person wrote.
The globe button at the top right switches between Korean and English. What changes is the interface wording; question text always shows the original and its translation together.
Chapter 5
The moderator’s working screen
During the event a moderator watches this one screen. Incoming questions on the left, the running order for the presenter on the right.
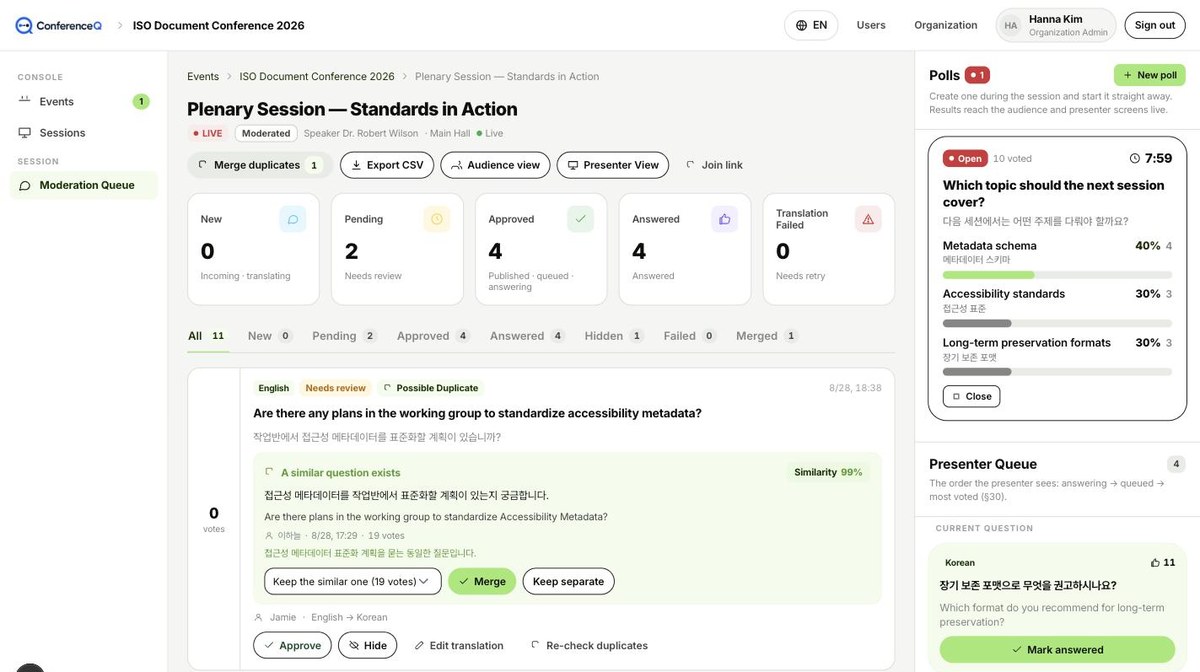
- Approve — the question appears in the audience list and in the Presenter Queue.
- Hide — it drops off the audience screen. This conceals rather than deletes; the record stays.
- Edit translation — fix an awkward rendering. Your edit is stored separately; the machine translation is kept.
- Re-check duplicates — rescan just that question for near-matches.
Two moderators can safely touch the same question. The first action wins and the second one is shown the current state instead. Nobody silently overwrites anybody.
Merging duplicate questions
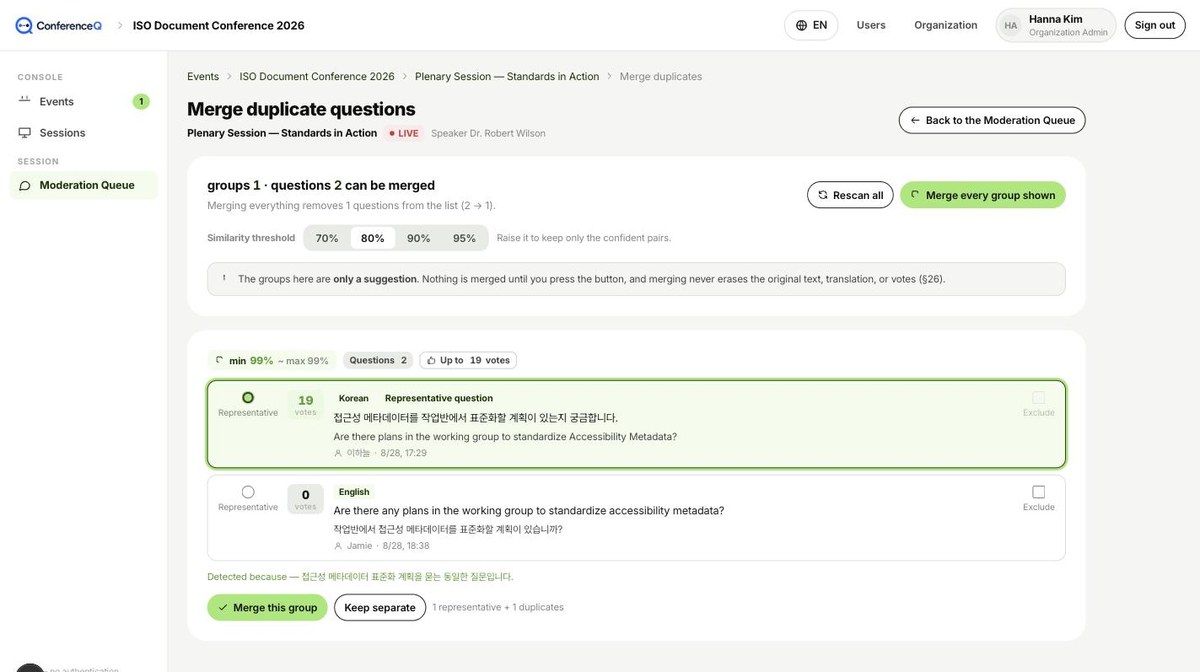
The groups here are only a suggestion. Nothing is merged until you press the button, and merging never erases the original text, its translation, or the votes.
On a narrow screen such as a tablet the right-hand panel is tucked away. The “Queue · Polls” button at the bottom right slides the Presenter Queue and polls out as a drawer.
Running a live poll
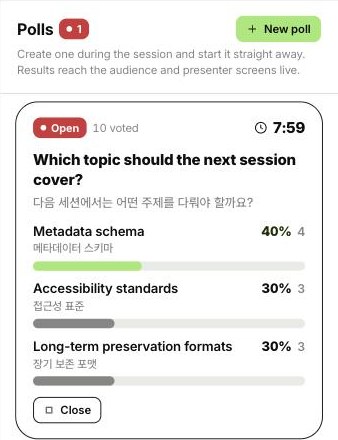
- New poll — one question and 2–8 options, in Korean or English, whichever is easier. The other language is added automatically the same way questions are (Glossary applied) and shows up on every screen a few seconds later. Pick a time limit from 30 seconds to 10 minutes, or leave it to close by hand.
- Create and start — it appears on the audience, presenter and projector screens at that moment. Save only keeps it as a draft to start later.
- Close — you can close it early by hand. When the time runs out the server closes it for you.
- Reopen — open a closed poll again with a fresh time limit. Votes already cast are kept.
Each person gets one vote and can change it until the poll closes. There is no sign-in, so a vote is counted per browser — the same as upvotes. Results live on screen and in the Audit Log, not in the CSV export. If translation fails you simply see the original — the poll itself never stops.
Running the Presenter Queue
The right-hand panel is the order the presenter will see: answering → queued → most voted. “Show on screen” makes a question the current one on the presenter’s screen; “Mark answered” takes it out of the queue.
Chapter 6
The presenter’s screens
The presenter has two screens: one they operate on stage, and one you put on the projector.
Presenter View — operated on stage
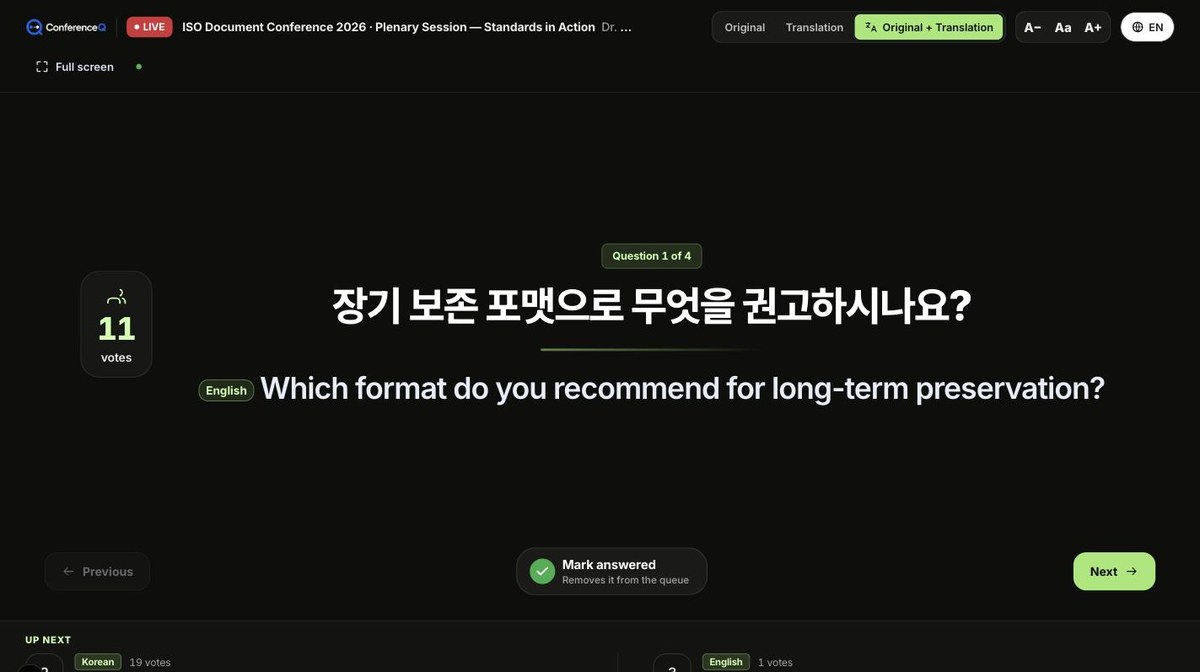
“Mark answered” is never applied automatically. A question leaves the queue only when the presenter presses it here or the moderator presses it in the Moderation Queue. Pressing “Next” alone leaves the question in the queue. Once the last one is answered the screen shows “All questions answered · N” — distinct from “Waiting”, which means no question has arrived yet.
Long questions shrink a step at a time, and if they still overflow only the question area scrolls — the controls at the bottom always stay on screen. If the connection to the server drops for a moment a notice appears, and it resumes on its own once reconnected.
Live poll results — small, large, minimal, hidden
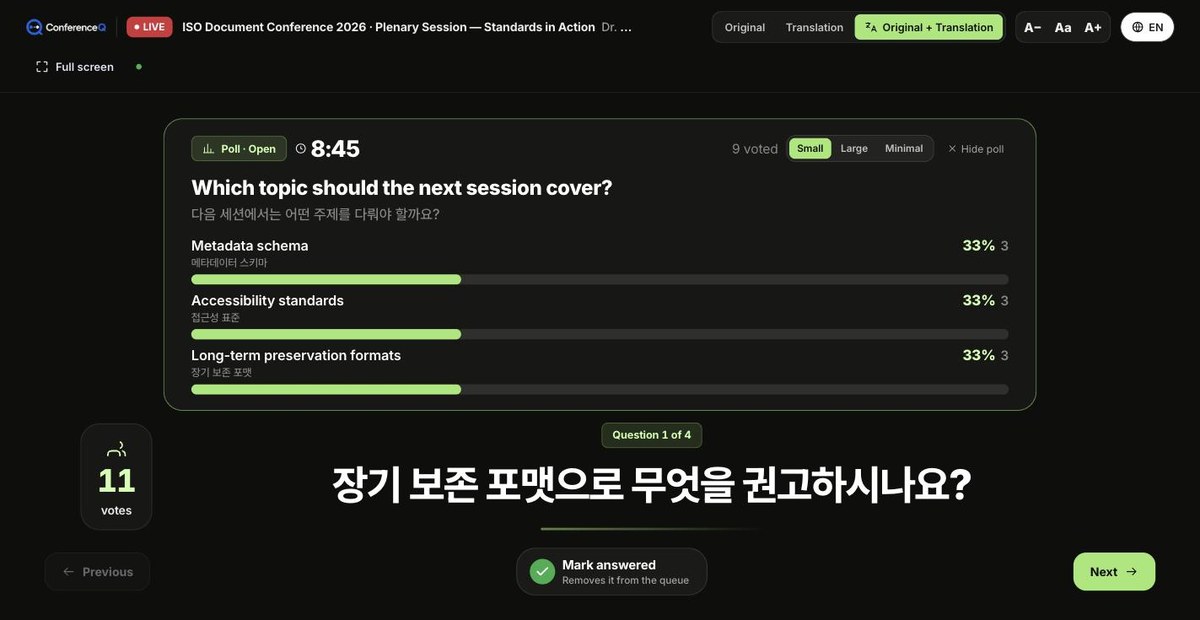
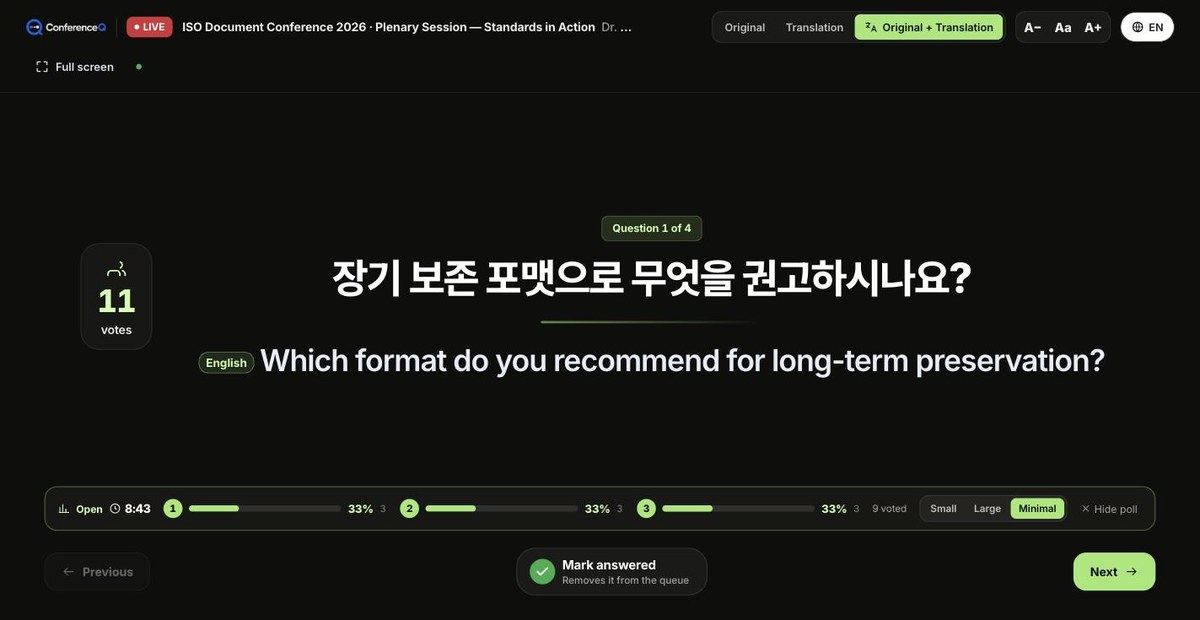
“Hide poll” tucks away the current poll only; “Show poll” in the top bar brings it back. Your small/large choice is remembered in this browser and applies to the next poll too. After a poll closes the results stay for 45 seconds, then step aside on their own.
Stage Display — for the projector or LED wall
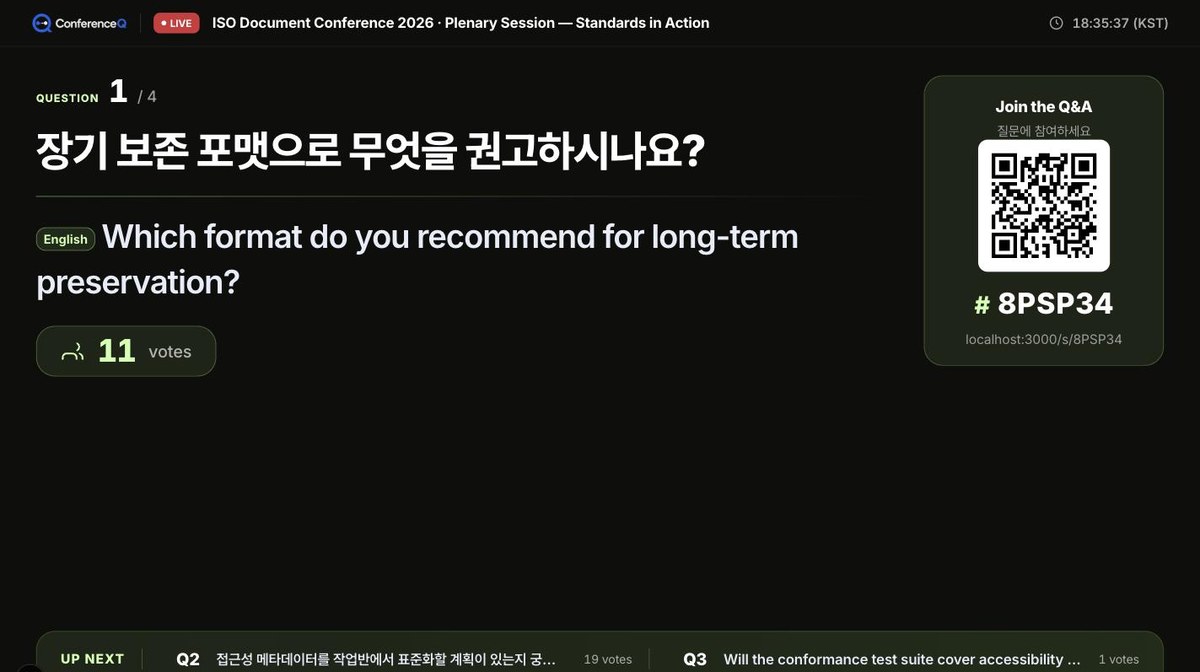
On the projector an open poll replaces the question with large results (there are no controls). The join card carries a QR code, so latecomers can join from the screen alone.
Both screens share one live session. When the moderator presses “Show on screen”, both update without a refresh.
Chapter 7
Live captions
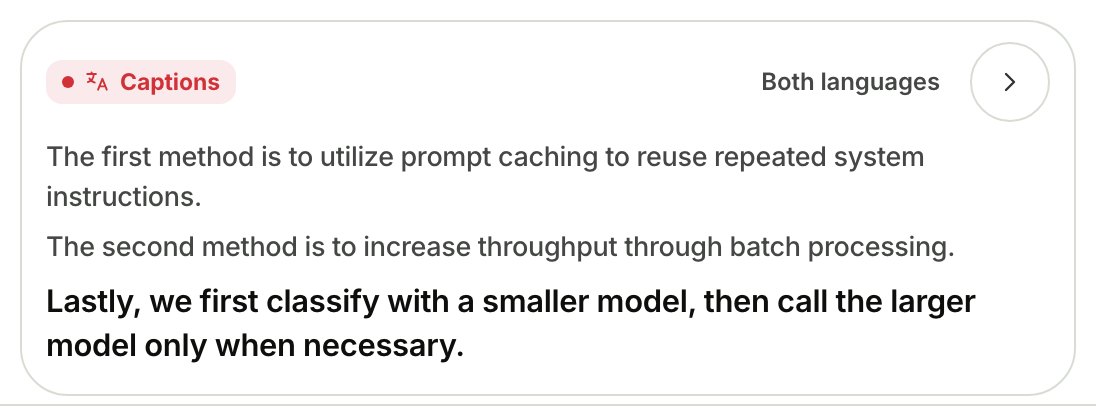
As the speaker talks, each sentence is recognized in the presenter’s own browser and sent to the audience and the stage as captions. Same principle as questions — the original is kept and the translation sits beside it, and the moderator turns it on or off.
Captions are recognized in the presenter’s browser — use Chrome on a laptop. Only the recognized sentences reach the server. Translation depends on the plan: paid plans translate on the server with your Glossary applied, and the free (Starter) plan translates in the presenter’s browser. Recognition and captions themselves work on every plan.
Presenter — starting captions

- The moderator can fix the speech language; otherwise the presenter picks KO / EN.
- On-device recognition is the default — the audio never leaves the machine. If that language isn’t available it falls back to cloud recognition automatically.
- A strip on the presenter screen shows the sentence just recognized, its translation, and which engine is in use (on-device / cloud, server / browser translation).
Captions on the audience screen
Moderator — on/off and cleanup
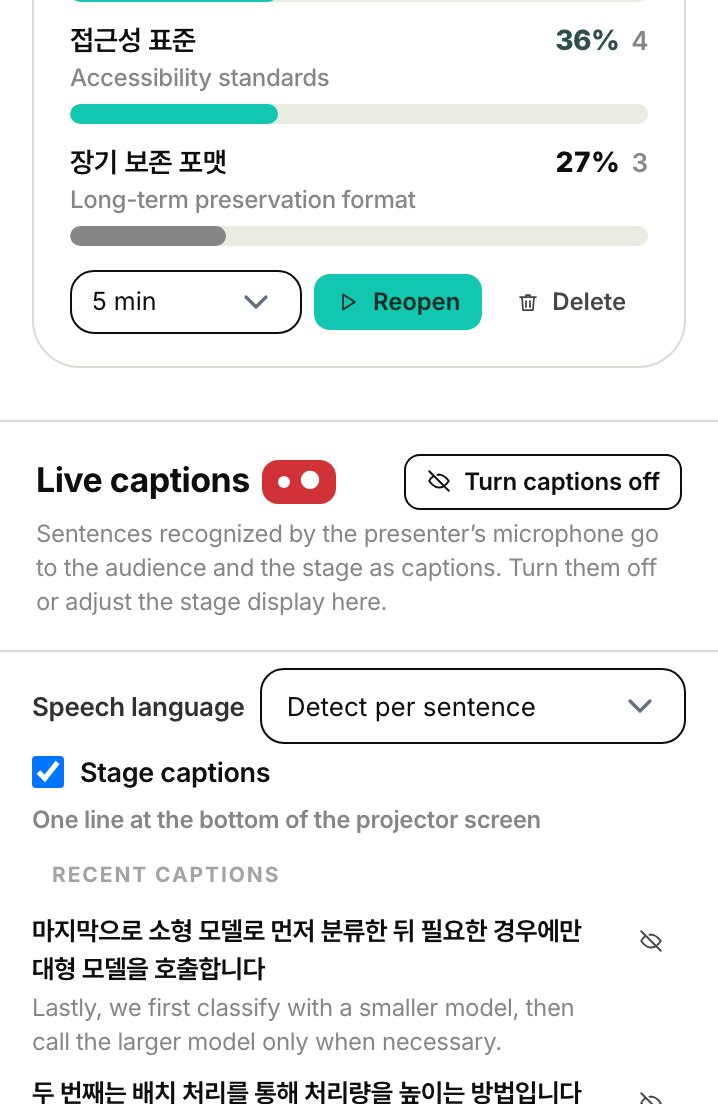
Speech recognition splits sentences where the speaker pauses and can mishear technical terms. Server translation stitches these fragments together using the Glossary and surrounding context and corrects the mishearings — so for a talk that leans on precise terminology, fill in the Glossary and use a paid plan’s server translation.
Chapter 8
Stage slides
An optional way to show the session’s uploaded material (PDF) on the stage screen, one page at a time. Pages are turned with the arrow buttons on the presenter screen.
Presenter — turning pages

The stage screen
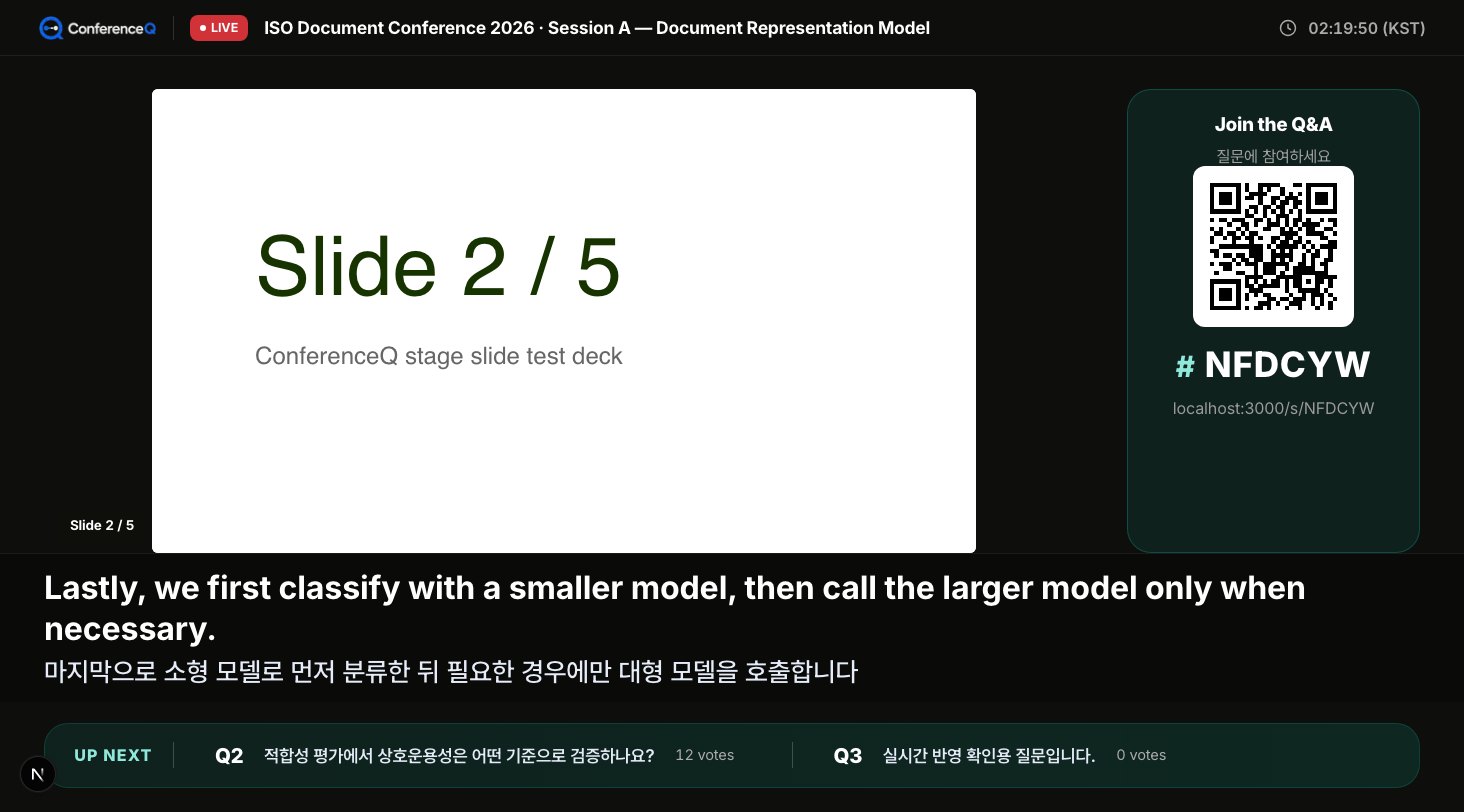
- In the console’s right-hand panel, Stage slides is where you pick which material to use and turn the stage display on.
- Upload a PDF under the session’s materials and it appears here and on the presenter screen right away.
- To toggle just the stage captions on the spot, add
?captions=1or?captions=0to the stage URL.
Chapter 9
During and after the event
Keep the dashboard up while the event runs; afterwards, build your report from the analytics and the log.
Dashboard — what you watch during the event
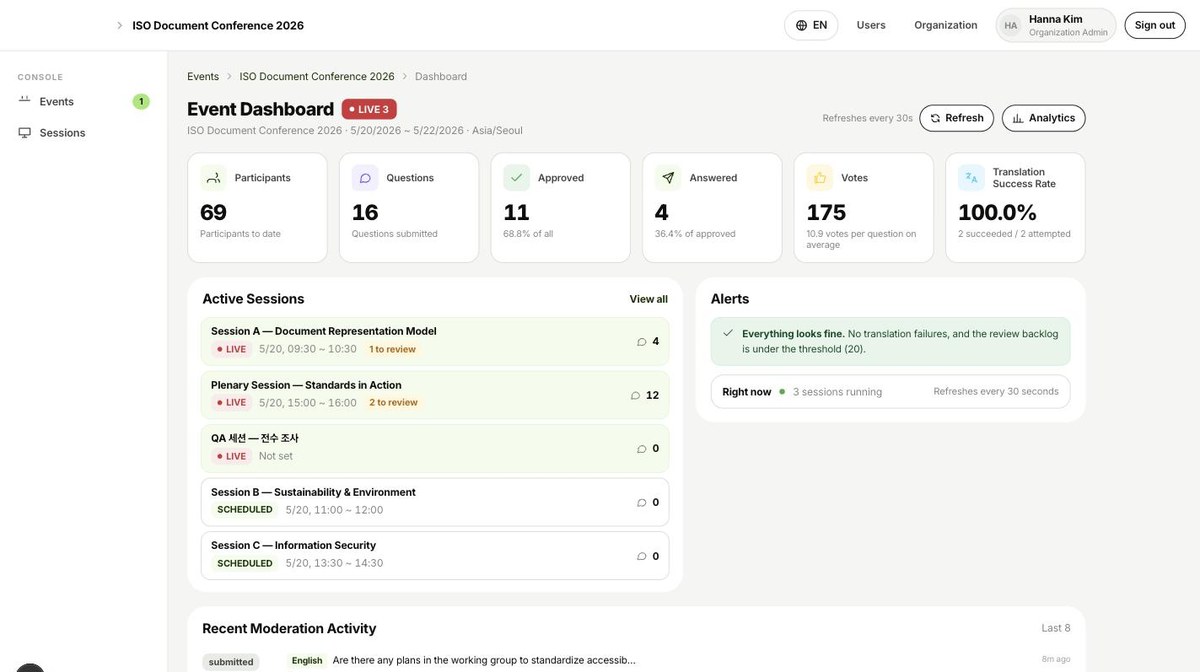
Alerts watches for translation failures and a growing review backlog. Past 20 questions awaiting review it warns you — that is the moment to put a second moderator on it.
Analytics and CSV
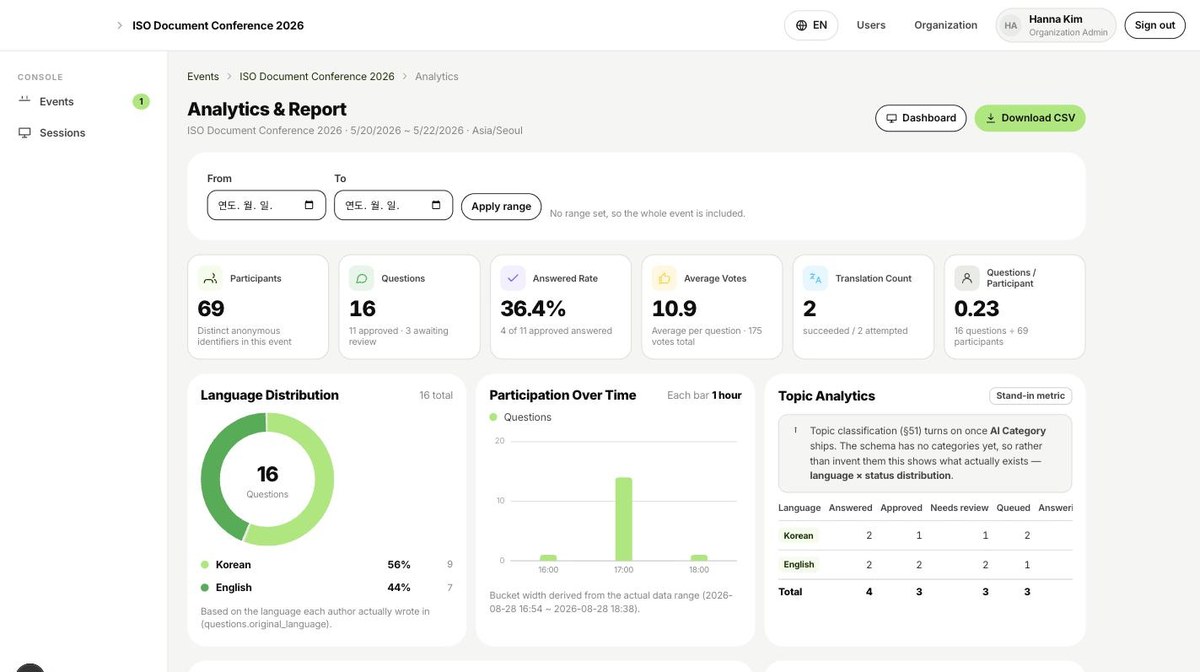
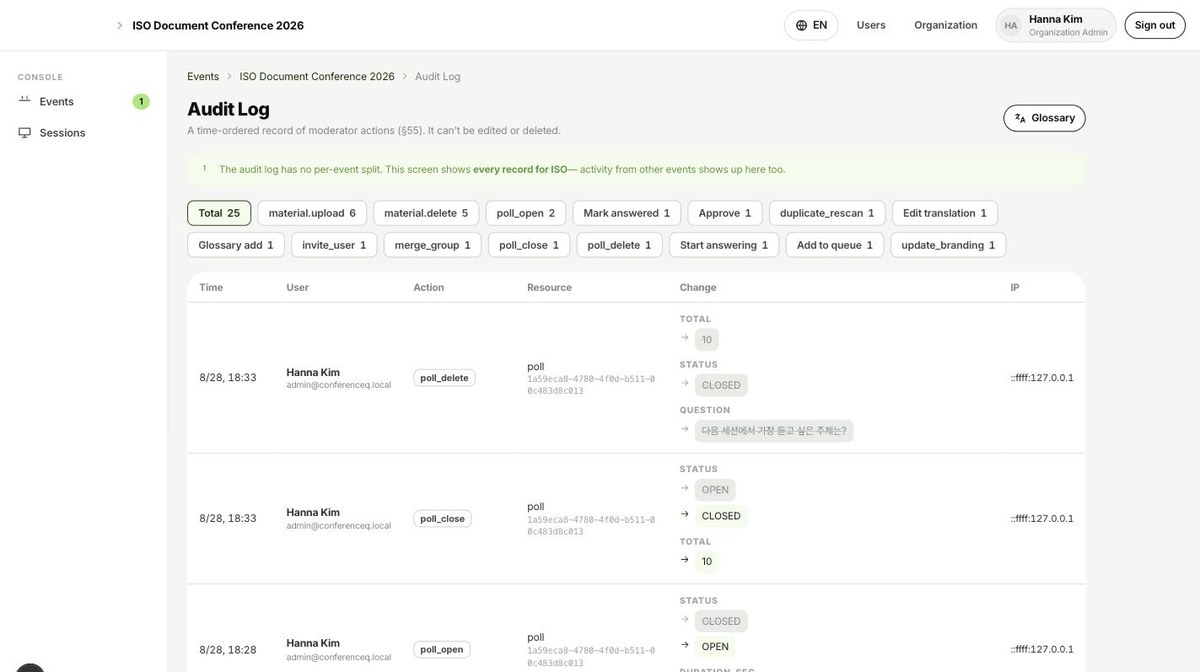
Audit Log
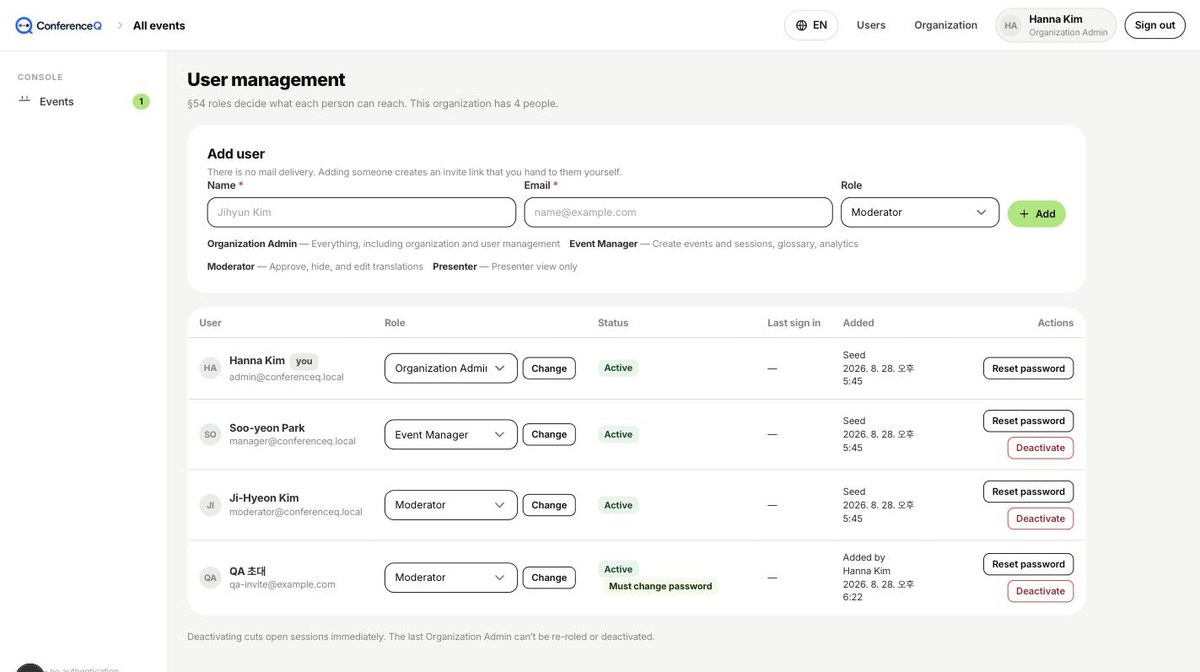
Users and the organization
Appendix
Question status reference
| Status | Meaning |
|---|---|
| Received | Translation starts shortly. |
| Translating | Being translated. |
| Needs review | Waiting for a moderator. Not yet visible to the audience. |
| Approved | Visible in the audience list. |
| Queued | Sitting in the presenter’s queue. |
| Answering | Being answered right now. |
| Answered | Answered. |
| Hidden | Hidden by a moderator. Not deleted. |
| Duplicate | Merged into another question. |
| Translation failed | Translation failed. The original text is preserved. |
Permission matrix
| Organization Admin | Event Manager | Moderator | Presenter | |
|---|---|---|---|---|
| Organization settings | ● | · | · | · |
| User management | ● | · | · | · |
| Create events and sessions | ● | ● | · | · |
| Manage the Glossary | ● | ● | · | · |
| Analytics and Audit Log | ● | ● | · | · |
| Approve and hide questions | ● | ● | ● | · |
| Edit translations | ● | ● | ● | · |
| Create and close polls | ● | ● | ● | · |
| Show a question on screen | ● | ● | ● | ● |
| Presenter View | ● | ● | ● | ● |
Troubleshooting
| Symptom | What to check |
|---|---|
| The audience says they can’t submit a question | Check that the session is live. Submission is closed while it is scheduled, paused or ended. |
| Nothing is being translated | Saving a question is independent of translating it, so the question survives a translation failure. Failed ones collect under Translation Failed in the Moderation Queue, and the dashboard Alerts flags them. |
| Terminology keeps changing between translations | Register the term in the Glossary. Terms apply from the next translation onward, so add them before the event. |
| Scanning the QR lands somewhere unexpected | A QR encodes the domain it was generated on. Before printing, check the URL under the QR is your real service address. |
| The presentation materials are gone | Archiving a session deletes its materials too. That can’t be undone — keep your own copy before you archive. |
ConferenceQ · conferenceq.live · mudotmusic@gmail.com